
Petra is almost 3 months old. The collection of pictures meant to hang on her wall is almost 5 months old... I've been procrastinating putting them up because 1) I'm not very good at arranging things, and 2) I'm very good at procrastinating.
Matt's recent appendectomy made him a perfect candidate (as the resident-artist-with-more-than-a-few-spare-moments) to help me get the images on the wall. When I laid them out, I kept finding myself naturally putting them into a grid, which ruined the effect I was going for: I wanted the images to look crowded on the wall giving the room a fuller feel. I was also trying to pay homage to my dad's similar nautical theme the den he had in the house I grew up in - the crowded, global nicknacks leant to an air of travel that I wanted.

1) I measured the area on the wall I wanted to fill.
2) Then I laid out that area on the floor and arranged the pictures in it over and over until I got a configuration that pleased me.
Matt laid out an initial pattern for the images that gave each pictures an inch or two of breathing room. The arrangement looked nice, but again, I wanted to have a crowded feeling. After some rearranging and the addition of a few blank frames, we came up with this - "french gallery" he called it - layout; there is a diagonal sweep and the sizes are deliberately varied in their positions.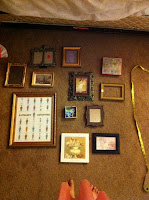 3) Next I flipped all the frames over exactly where they were laying.4) I laid tissued paper over the frames and marked where the hanging holes were.
 5) Then, I taped the tissue paper to the wall* and proceeded to place the nails, in the marked places.6) After getting all the nails in place, I hung the pictures up to make sure the translation from floor wall worked.(*I ended up moving two of the images around after the tissue paper draft on the wall. Even after putting the nails in the new configuration, I left an image off until after I put up all the pictures of the wall paper. Then, I redrew in darker marker where I thought the new placement of the picture should go, approved, and added the nail. Glad I double checked before adding unnecessary holes!)
 7) Finally I removed the images, tore down the tissue paper - leaving the nails behind -and hung up all the images.


Viola!
---------------------------------------------
Who says you need to buy toys for baby?!
Petra had a grand time playing with the tissue paper, kicking and crumbling it awkwardly in her new grip; it was the first time I saw her stimulate herself without a cooing parent over her!
3 comments:
Brilliant idea for hanging the pictures. They and the room look great.
This is genius.
This is genius.
Post a Comment